The security of online communication and data transfer is of paramount importance. One crucial aspect of securing websites, servers, and other digital assets is the use of SSL/TLS certificates. A Certificate Signing Request (CSR) is a vital component in obtaining a trusted SSL/TLS certificate from a certificate authority. In this blog post, we will explore how to generate a CSR in Windows Server, enabling you to enhance the security of your digital infrastructure.
A Certificate Signing Request (CSR) is a file that contains essential information about your organization and the desired SSL/TLS certificate. It is generated on the server where the certificate will be installed. The CSR serves as a formal request to a Certificate Authority (CA) to issue a digital certificate, which is necessary for establishing a secure connection with your server.
To generate a CSR in Windows Server, the first step of the SSL installation process follow these steps:
Step 1: Open the Internet Information Services (IIS) Manager
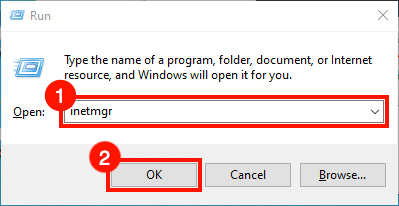
Launch the Internet Information Services (IIS) Manager on your Windows Server. You can usually find it in the Administrative Tools or by searching for "IIS Manager" in the Start menu. To accomplish this task swiftly, you can follow these steps: Open the Run command, enter "inetmgr" and proceed by clicking the OK button as shown in the image.
Step 2: Select the Server
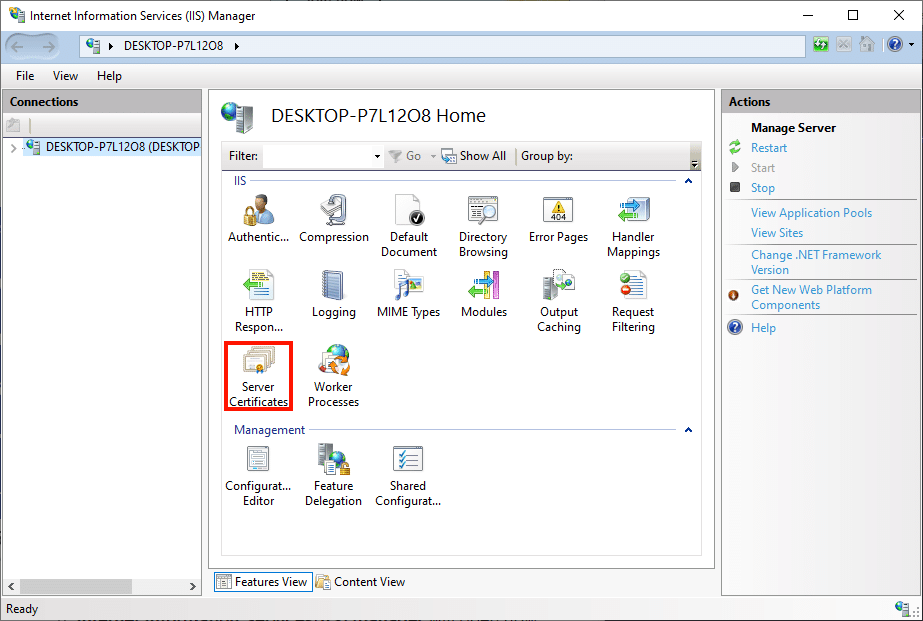
Once the IIS Manager is open, select your server's name in the Connections pane on the left-hand side.
Step 3: Open "Server Certificates"
In the main window, locate and double-click on the "Server Certificates" option.
Step 4: Access the “Create Certificate Request”
In the Server Certificates window, under the Actions pane on the right-hand side, click on "Create Certificate Request" This action will open the Certificate Request Wizard.
Step 5: Enter the Distinguished Name Properties
In the Certificate Request Wizard, enter the necessary information for the certificate's Distinguished Name Properties. These properties include Common Name (e.g., a fully qualified domain name like www.Mydomain.com, or store.mydomain.com). You can also use a wildcard, Such as *.Mydomain.com. Other details are Organization, City/Locality, State/Province, and Country/Region. Provide accurate and complete details as required related to your company or organization. Please use the two alphabet abbreviation for your country.
Once you have completed filling out the form, please proceed by clicking the Next button.
Step 6: Select Cryptographic Service Provider (CSP) and Bit Length
Choose the Cryptographic Service Provider (CSP) and the Bit Length for the private key associated with the CSR. It is recommended to use the default options unless you have specific requirements that necessitate changes. Once you have completed it, please proceed by clicking the Next button.
Step 7: Specify the File Name and Location And Generate the CSR
Provide a suitable file name and location for saving the CSR file. Ensure you choose a secure location accessible only to authorized personnel. Review the pieces of information you have provided in the previous steps. Ensure the details are accurate and free of errors. If any changes are required, use the "Previous" button to revisit the respective steps and make adjustments. Once you are satisfied with the CSR details, click on the "Finish" button to generate the CSR file. The file will be saved at the specified location.
Step 8: Next Steps
Congratulations on completing the CSR generation task! Next, you can go for domain authentication by creating a .well-known directory suitable for your server. Once you're prepared to submit the CSR (Certificate Signing Request) to SSL.com for signing, open it in a text editor. To learn how to submit your CSR to SSL.com, please refer to our comprehensive guide on CSR submission. When you're ready to install the certificate, we recommend checking out our helpful tutorials on SSL certificate installation, binding in IIS (Internet Information Services), and HTTP to HTTPS redirection on a Windows server.
Conclusion:
Generating a Certificate Signing Request (CSR) in Windows Server is a critical step in obtaining an SSL/TLS certificate to secure your digital assets. By following the step-by-step guide outlined in this blog post, you can easily generate a CSR using the Internet Information Services (IIS) Manager. Remember to provide accurate information during the CSR creation process to ensure a smooth certificate issuance process. By implementing SSL/TLS certificates, you can enhance the security and trustworthiness of your online presence, safeguarding sensitive data and building confidence among your users and customers.