Securing your website with an SSL certificate is crucial for protecting sensitive information and ensuring a safe browsing experience for your users. In this guide, we will walk you through the process of binding an SSL certificate to a website in Windows Server. Binding an SSL certificate to a website in a Windows server refers to the process of associating or linking a specific SSL certificate with a particular website or web application running on a Windows-based web server. This is done to enable secure communication between the server and the clients accessing the website. By following the simple steps given below, you will be able to successfully configure SSL encryption for your website and enhance its security. (These instructions presume that you have previously completed the process of generating a CSR, domain authentication by creating a .well-known directory and installation of your SSL certificate in IIS. To know all steps of the SSL installation process without a control panel on the Windows server, you must check this).
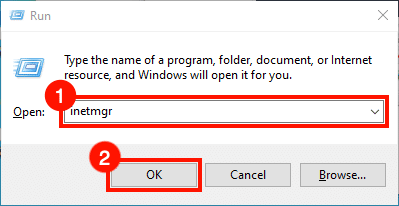
Launch the IIS Manager by pressing the Windows key, typing "IIS," and selecting the "Internet Information Services (IIS) Manager" from the search results. Another way to do it is with the help of the Run command. Open it, type inetmgr, and click the OK button.
Step 2: Select the website
The Connections pane will open and on the left side of the window, you can navigate to your server and website where you want to bind the SSL certificate. Select the website to which you want to bind the SSL certificate. It will be listed under the "Sites" node.
Step 3: Open bindings
Double-click on the "Bindings" icon in the Actions pane right side. This will open the Site Bindings box.
Step 4: Add a Binding: Click Add
Click on the "Add" button in the Site Bindings box to add a new binding.
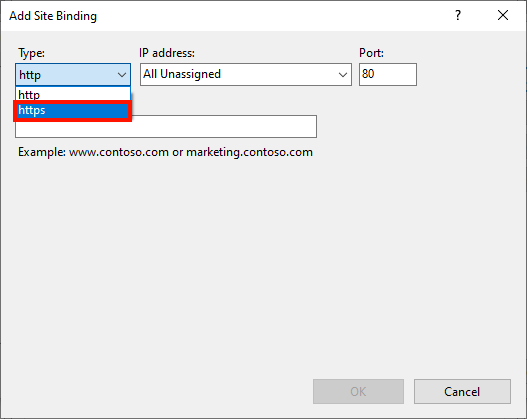
Step 5: Select the binding type
Among the Site Binding option list, select "https" as the Type.
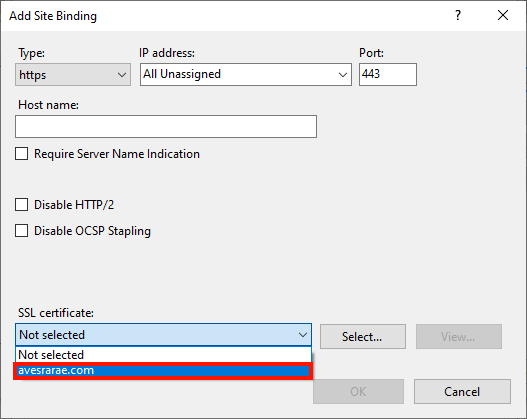
Step 6: Select IP address
Choose the IP address you want to use for the SSL binding. If you have multiple IP addresses assigned to your server, select the appropriate one. Otherwise, you can select All Unassigned or the site’s IP address.
Step 7: Enter the port
Set the port number to "443" for SSL.
Step 8: Select Certificate
Select the SSL certificate from the SSL certificate drop-down list. If the certificate is not listed, make sure it is properly installed on the server's certificate store.
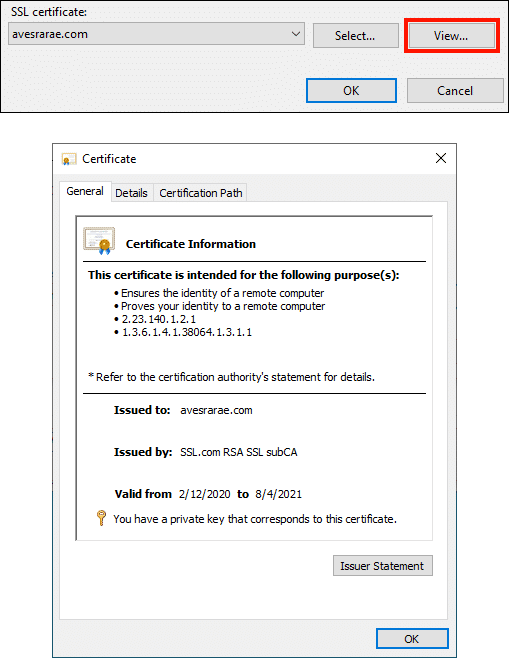
Step 9: View certificate details
To obtain specific information about the chosen certificate, simply click on the "View..." button. After viewing the details. Click "OK" to save the binding.
Step 10: Fill Host name if necessary
If you are utilizing a single IP address to serve multiple domain names, please input the IP address in the Host name field and select the "Require Server Name Indication" option. If this does not apply to your situation, you can leave these fields blank without any concern.
Step 11: Close the “Add Site Binding” window
Click "OK" to close the Add Site Binding window.
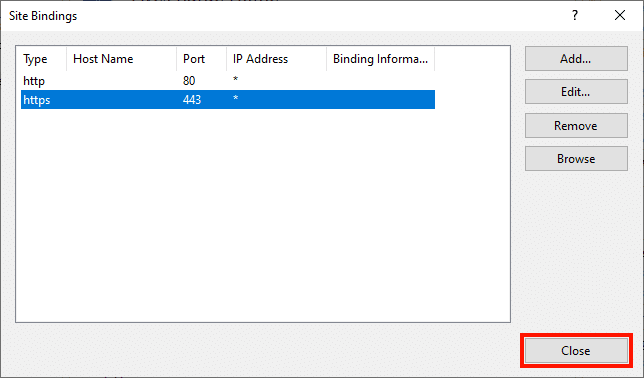
Step 12: Close the “Site Bindings” window
Back in the Site Bindings window, you should see the new binding listed. Click "Close" to exit the window.
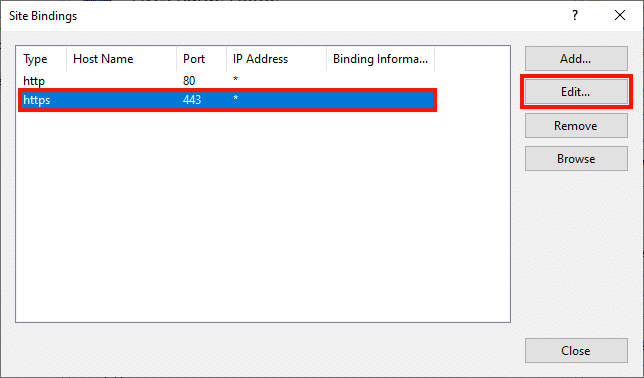
Step 13: If needed, you can Edit existing binding
To modify an existing binding, you have the option to edit it. To proceed, follow these steps: select the item you wish to modify and click on the "Edit" button. Within the editing interface, you can make adjustments such as altering the port, IP address, host name, and certificate that should be utilized.
Step 14: What Next
After successfully binding the certificate to your website, it's essential to configure a redirect to ensure that all incoming HTTP traffic is redirected to HTTPS. If you want to follow the next steps, you can read How to redirect your website HTTP to HTTPS on a Windows server.
Conclusion:
By following these 14 steps, you can easily bind an SSL certificate to your website in Windows. This process enhances your website's security and ensures that sensitive information transmitted between your server and clients is encrypted. Remember to keep your SSL certificate up to date by renewing it periodically. With SSL encryption in place, you can provide a secure browsing experience to your users and build trust in your website's security.